Documentation
Signing
- ✅ 2.2 | ✅ 2.1 | ✅ 2.0 | ⛔ 1.9 | ...
Removing pop-ups to achieve silent printing requires message signing for each print function. This tutorial will demonstrate the steps needed for leveraging our digital-certificate.txt and private-key.pem to sign messages. This also applies to pop-ups for serial, usb or network communications.
We have several tutorials/videos that walk you through using the demo and sample.html webpage that ships with our software.
- Video tutorials 🎥 :
- Written tutorials 📜 :
- Generate Signing Keys
- Create your back-end function
- Create your client-side functions
- Advanced Configurations
In order to remove the dialogue warnings, a certificate and private trusted by the root certificate in QZ Tray must be generated. "Premium Support", "Company Branded" and "Premium Sponsored" customers may generate a digital-certificate.txt and a private-key in pem and pfx formats through our portal following these steps
Once you've downloaded these, copy them to your webserver.
- Move your
private-key.pemto your webserver.-
Note: If in a .NET environment, you will need to use the
pfxformat instead.
-
Note: If in a .NET environment, you will need to use the
- Move
digital-certificate.txtto your server. Make this publicly available so it can be accessed through AJAX.- Note: This will need to be replaced every 1-5 years, depending how long you purchased support for
Utilizing a back end function / controller is the preferred method for implementing signing. If a 100% client-side solution is mandatory, please reference this tutorial for a JavaScript signing example.
Any language capable of reading an RSA private key and generating an SHA512 (or for 2.0 users, SHA1) base64 encoded signature hash will work. We have examples in many other languages including: Ruby, Python, JavaScript, C#, J#, Java, ASP and VB
- Create a function/controller on your back-end server. In this example, we created
sign-message.phpwith the below contents.- Make sure to update the
$KEYwith the correct path to your private key.
- Make sure to update the
In the next steps we will call this function using AJAX.
<?php
$KEY = 'path/to/private-key.pem';

$req = $_GET['request']; //GET method
$privateKey = openssl_get_privatekey(file_get_contents($KEY));

$signature = null;
openssl_sign($req, $signature, $privateKey, "sha512"); // Use "sha1" for QZ Tray 2.0 and older

if ($signature) {
   header("Content-type: text/plain");
   echo base64_encode($signature);
   exit(0);
}

echo '<h1>Error signing message</h1>';
exit(1);
?>Both of these functions are required in order to remove all of the dialogue warnings. QZ Tray will automatically call these as needed.
This function is called automatically when the initial websocket connection between the browser and QZ Tray is attempted.
-
Add the below code snippet to your webpage, before any qz function calls.
- You can test if your certificate is loading properly by connecting to your webpage. If the dialogue pop-up contains your company's information, this is working correctly.
qz.security.setCertificatePromise(function(resolve, reject) {
   fetch("assets/signing/digital-certificate.txt", {cache: 'no-store', headers: {'Content-Type': 'text/plain'}})
      .then(function(data) { data.ok ? resolve(data.text()) : reject(data.text()); });
});
fetch()can be replaced with any ajax library of choice ($.ajax(),xhr,PageMethods, etc).
This function is called automatically on each print/function call. It is responsible for getting a base64 signature from the back-end function created in the previous step.
-
Add this function directly below your
setCertificatePromiseqz.security.setSignatureAlgorithm("SHA512"); // Since 2.1 qz.security.setSignaturePromise(function(toSign) { return function(resolve, reject) { fetch("/secure/url/for/sign-message?request=" + toSign, {cache: 'no-store', headers: {'Content-Type': 'text/plain'}}) .then(function(data) { data.ok ? resolve(data.text()) : reject(data.text()); }); }; });
That's it! If everything is working, all dialogue windows should be trusted. You should be able to "Allow" and "Remember this decision".
A pure client side/offline solution is supported. This method is not preferred as it exposes your private key and signature. Please refer to the below guide for a walk-through tutorial on this setup.
Our samples use fetch();, however you can use any AJAX method to retrieve the certificate/signature
qz.security.setSignatureAlgorithm("SHA512"); // Since 2.1
qz.security.setSignaturePromise(function(toSign) {
   return function(resolve, reject) {
      $.post("assets/signing/sign-message.php", {request: toSign}).then(resolve, reject);
   };
});
.NET conveniently exposes a promise-friendly PageMethods object which is capable of calling a server-side .NET function by name directly from JavaScript. This assumes a server-side signing example has already been setup in C#, VB.NET, etc.
qz.security.setSignatureAlgorithm("SHA512"); // Since 2.1
qz.security.setSignaturePromise(function (toSign) {
   return function (resolve, reject) {
      PageMethods.SignMessage(toSign, resolve, reject);
   };
});A demo key pair can that is trusted by QZ Tray can be generated for development. The key pair will only work with the QZ Tray installation on the computer you generate them on, but it will allow you to setup silent printing for development.
-
With QZ Tray installed on your dekstop, go to QZ Tray > Advanced > Site Manager
-
Click the
+sign and Create New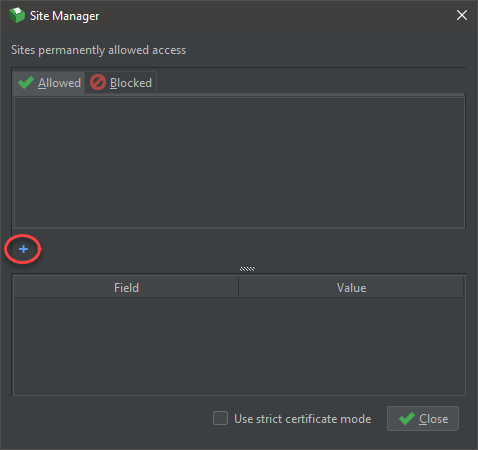
-
Click "Yes" to create the keys, "Yes" to automatically install, and "Yes" to automatically copy the keys to
override.crt -
Allow any UAC (on Windows) prompts for the installation to complete.
-
A
QZ Tray Demo Certfolder will be placed on your desktop with keys thedigital-certificate.txtandprivate-key.pemyou can use for signing.
| Component | Format | Description |
|---|---|---|
private-key.pem |
PKCS#8 |
🔑 Private key used for signing, must be 2048-bit |
private-key.pfx |
PKCS#12 |
🔑 Optionally replaces .pem file for .NET environments, must be 2048-bit |
digital-certificate.txt |
x509 |
🔒 Trusted certificate |
-
Provide a file called
override.crt(e.g.C:\Program Files\QZ Tray\override.crt) (since 2.1)
-- OR -- -
Launch QZ Tray using manually specified certificate (since 1.9.7)
java -Xms512M -DtrustedRootCert=override.crt -jar qz-tray.jar
- For more command-line options, see Command Line Usage
-- OR -- -
Add an entry to
qz-tray.properties(since 2.0.2)authcert.override=/path/to/override.crt